Showing posts with label Costume. Show all posts

Sunday, February 12, 2012

Pink and Blue Sleeping Beauty Gown: Photoshoot

Click here for the making of the Sleeping Beauty Dress - Part 1
Click here for the making of the Sleeping Beauty Dress - Part 2
Click here for the making of the Sleeping Beauty Dress - Part 3
Click here for the making of the Sleeping Beauty Dress - Part 4
Click here for the making of the Sleeping Beauty Dress - Part 5

Wow, that hemming took me nearly three hours straight, but yaaaaay it was finally finished! And all of it in under a week! *** Granted it was nearly 10 hours a day, 6 days straight… but I was still proud. ***

Enough blabbering, now for what people really want; the photos!

First up is a shot of me and a couple of other Disney princesses at the New Years party the dress was made for.
2012 New Years Party 068
I don’t know what it is about me and cameras, but I always tend to make a stupid face whenever someone snaps a shot. There are lots more pictures of me from the party… but none I really need to spread around the internet anymore than they already are ^_~.

So, in order to grab some shots where I wasn’t making goofy faces I drug my guy out a few weeks later for a diy photo shoot. This mostly involved us driving around town looking for pretty backdrops to shoot at. Here are a couple of those photos:

First we found a pretty lake with some swans.

Princess Aurora's Pink and Blue Gown (Back with Swans)
And here is one with some thorn type bushes in the background.

Princess Aurora's Pink and Blue Gown (Thorn Bushes)

While these were nice and all, we really hit gold with a super pretty church downtown.

Princess Aurora's Pink and Blue Gown  (Close Up)

Princess Aurora's Pink and Blue Gown  (Sitting at Table)

Princess Aurora's Pink and Blue Gown  (Flared Skirt)

And last but not least, my absolute favorite shot of the entire day….

Pink and Blue Sleeping Beauty Dress

The sun in my eyes was so painful, but I’m really glad Jason made me open them for this picture. It turned out to be really nice.

So that about wraps things up on this gown. It was a weeks worth of hard work, but turned out to be one of my favorite costumes to date. Sadly it will probably be the last costume I make for quite awhile. With my wedding coming up in May I need to start in on the bridesmaids dresses soon. Three full corsets, mockups, and gowns are sure to take quite a bit of time. But hey, they kinda count as costumes though, right?

Saturday, February 11, 2012

Making it fit for Princess Aurora

Click here for the Princess Aurora Dress - Part 1
Click here for the Princess Aurora Dress - Part 2
Click here for the Princess Aurora Dress - Part 3
Click here for the Princess Aurora Dress - Part 4 

I know, I know, I’ve been a slacker. I’m trying really hard to keep to a two day update schedule, but sometimes life gets crazy busy. In order to make up for my breach of the schedule I’ll try to post the finished dress tomorrow. Now, onto the construction!

Since I couldn't find a pattern, or really even a good reference, I just free handed the collar and over skirt with some muslin until I was happy.
Sleeping Beauty Pink and Blue Gown Construction (23)
If you noticed, I did make a slight tweak from the reference picture in regards to the overskirt. In the movie the tri peaks were all connected as one skirt, but in execution this creates a bit of a problem. At what angle do you cut the skirt so that it has sufficient give for the hips, while at the same time fits snugly to the skirt? Plus, where would I add seams so I could create the splash effect? While that’s all technically doable, there wasn’t any real reason for it other than blind dedication to accuracy. *** I know, funny coming from me considering the fit I had about the Disney World collars *** In any case, I decided to stick with separate petals for the overskirt. I could argue that it was for unhindered movement, but really it just made my life easier.

Oh! You know how the other day I said no matter how many lists I made I still managed to find ways to  screw up the little stuff? This over skirt was a perfect example. I sewed it together wrong not once, but twice! The first time was just me being silly and skipping a step by sewing the front and back together before I’d added the splashes… but the second time was far worse. I really wanted the overskirt and underskirts splashes to line up so I went through the tedious task of making sure every last swirl was right. Since I’d used the last of my pink polyester fabric for the actual gown lining, I had to use the light pink suede on both sides of the splash panel. This meant, unlike before where they were two different shades of pink, both the front and the back of the splash looked identical. I didn’t even think about it before I slapped the pink splashes on my blue panel and appliqued them on. It was so sad when I held my finished panel up to the dress and noticed the colors were all backwards.

Ah well, live and learn. They were relatively small pieces so it didn’t take to terribly long to make a new one. I made sure to quadruple check before I appliqued this time!
Sleeping Beauty Pink and Blue Gown Construction (30)
Even though I absolutely love the splashes on this dress, the detail I actually liked most was the collar; especially that it’s made in two different colors. In my research for this gown I found costume, after costume, after costume with white collars. And Disney itself was the main perpetrator of this error! Their massed produced pink gowns all had stark white collars. I don't understand why though, in the movie they were always either a light blue or pink. It's not like it would have cost anymore to put light pink on their sewing lines... /shrugs.

Any who, back to the dress. I was almost done! Sadly the next step was my second least favorite thing to do in the whole wide world! Zipper basting.

Sleeping Beauty Pink and Blue Gown Construction (33)
Really any kind of basting is horrible in my book. It seems so utterly pointless to put in a bunch of stitches you know you’re going to take right back out again! I suppose it’s a necessary evil though.

The zipper and I had some disagreements when it came to this dress. I’d changed the location and put it up the pink side seam instead of the back due to the splashes, but it was not happy about the joint where the bodice meet the over skirt and underskirt. After a firm talking to, and some deftly utilized scissors on some seam allowances, it finally decided to behave.

So with that out of the way I just needed to add some extra last minute splashes, insert the lining, and then do my absolute least favorite sewing duty; hemming. Uggggh. Ball gowns of this size are just sooooo big, so hemming seems to take forever and five days!

Sleeping Beauty Pink and Blue Gown Construction (36)
This was about the time I started whining to Jason, ‘Can’t I just go as Mickey… I don’t have to hem a gown to be Mickey.’ Since he’d been practically abandoned for the past 6 days while I sewed this gown he flately refused and told me I had to be Aurora. *** With malicious glee in his eyes I might add *** Bah!...

To be continued…

Click here for the Princess Aurora Dress - Part 6

~~~~

Is there a sewing task that you absolutely hate doing like hemming?

Wednesday, February 8, 2012

Sleeping Beauty Dress: The Skirt

Click here for Sleeping Beauty's Pink and Blue Gown - Part 1
Click here for Sleeping Beauty's Pink and Blue Gown - Part 2
Click here for Sleeping Beauty's Pink and Blue Gown - Part 3

Now that I was practically finished with the bodice panels, it was time to lay out the skirt front and back. If I thought the bodice was a lot of work, I was sure in for a rude awakening.

After pinning my two front pink pieces together, I quickly free handed some waves with fabric chalk. *** I <3 fabric chalk. When you mess up, you can just wash it away! ***

Sleeping Beauty Pink and Blue Gown Construction (Splashes)

Oye vey, I should have realized by the sheer size of the panel that I’d be in for hours of pinning. Between the four applique panels I used three entire boxes of fabric pins!

Sleeping Beauty Pink and Blue Gown Construction (Skirt Front)

Next it was time for hours upon hours... upon hours... of applique. Oh how I missed using my industrial  machine! This process definitely opened my eyes to the dedication of quilters. I'd have gone crazy if it weren't for my audio book in the background.

Sleeping Beauty Pink and Blue Gown Applique

Front, Back, Front, Left, Right, Front, Back, Front, Left, Right, Front…..

Once I finished with the tedium of applique, it was finally time to add some Sleeping Beauty flair to my gown!

Click here for Sleeping Beauty's Pink and Blue Gown - Part 5
Click here for Sleeping Beauty's Pink and Blue Gown - Part 6

~~~~~~~~~

Oh! While I’m thinking about it, is there anyway to avoid stabbing yourself with pins when you’re sewing?!? I think I must have stuck myself upwards of 300 times sewing these skirts together. My poor hands were in revolt for a week!

Monday, February 6, 2012

Princes Aurora’s Pink and Blue Gown – The Construction: Splish Splash

Click here for Sleeping Beauty's Pink and Blue Splashed Dress - Part 1
Click here for Sleeping Beauty's Pink and Blue Splashed Dress - Part 2

Okay, you know how I said I only had a week to make a full ball gown? Well, that was a total lie. I only had a week to make three ball gowns! Here, let me explain.

To make the two toned splash effect for this dress I had to make a base dress (half blue and half pink) plus the outer dress that would be in the opposite colors. Because I demanded quality out of this garment ***no shortcuts allowed even on a time crunch!*** I had to make a backing for the outer dress so when I turned it into splashes it wouldn’t fray along they edges. This brings the total to three.

I could probably try and get technical and say that I made the gown a fourth time to line it, but since I’d have done that regardless of the outer design I’ll just stick with three.
Sleeping Beauty Bodice Pattern
And my friends say I’m lazy… pfft.

Even though I didn’t start this dress until a week before the event, I knew I wanted to make the Sleeping Beauty dress ever since the New Years theme was announced back in September. Because of this I’d been keeping my eye out for fabrics over the previous few months. I thought I had struck pay dirt on one of my trips to Kansas where I found a gorgeous micro suede fabric in both pink and blue. Thinking it would make for an amazing bodice, I scoured the store for other fabrics that would compliment those tones and loaded up my cart. However, when lady at the cutting counter began unrolling the 8 yards of pink I’d need, we discovered that the bolt was actually just a collection of remnants… and they weren’t even from the same dye lot! Ugh! I was heartbroken. I knew the dress needed complimentary fabrics and tones or it would clash, and a patchwork of 5 different colored pinks just wouldn't do. Reluctantly I put everything back and went home empty handed.

*** Have ya’ll begun to notice a trend? I always seem to have trouble finding fabrics! Even though I know exactly what I want the stores never seem to carry it. I wonder if this is common problem for other people too. Hmm….***

Any who, I kept looking for fabrics for the next few weeks with no luck. It was getting closer and closer to go time, so I needed to find something soon. Before sucking it up and calling the company to rush order entire bolts, I decided to drive the hour south to Moore to take a chance on their fabric stores. As luck would have it they had almost the same exact fabric I wanted in the first place. Yay!

There was one little problem though. In the entire store there were no lighter pink and blue fabrics in the same tone. ***insert eye twitch here*** Okay, fine. The fabric gods have obviously deemed that I was not allowed to have a micro suede bodice for this gown. But I wasn’t going to let them have the last laugh. The back side of the micro suede fabrics were beautiful shades of pink in blue in just a few steps deeper than the front. I’d simply flip my original plan! Now the sleeves and flouncy overskirt would be made with the micro suede, and for the bodice and main skirt I’d just flip the fabric over.

See, I can be flexible. ***Sticks tongue out at the fabric gods***

So, now that I had my fabric purchased (all 24 yards of it @_@), I finally got started on the splash panels.
Sleeping Beauty Pink and Blue Gown Construction (5)
I’m not exactly sure if I can articulate how the splash panels were made. A vague overview would be that  I started with two layers of each panel, one the outer fabric and one a thinner lining fabric. After drawing some freehand splashes, I ran over the drawn lines with a straight stitch on my machine, flipped the fabric right side out, and then ironed it flat.

Hopefully that made sense. Perhaps one day I can make a video for the technique.

Once I finished each of the splash panels they were pinned onto their bases where they awaited their impending applique stitch!

Sleeping Beauty Pink and Blue Gown Construction (Bodice splashes)

Soooooo many needles. And this bodice was only 14 inches tallish? Just wait til you see the skirt!

Do you see my cute little cheat sheet up there? I was so of proud of it. In order to prevent myself from messing up, I wrote a list of every pattern piece, right side or wrong side, that I needed to cut out and in which color. It seems kind of OCD, but it was actually a huge helper. It’s super easy to cut out the wrong color or pattern side when you’re making a dress that is half one color and half another!

To be continued...

~~~

Do you have any tips for keeping your sewing projects organized? Even with my many lists I still sometimes find myself making tiny mistakes!

Click here for Sleeping Beauty's Pink and Blue Splashed Dress - Part 4
Click here for Sleeping Beauty's Pink and Blue Splashed Dress - Part 5
Click here for Sleeping Beauty's Pink and Blue Splashed Dress - Part 6

Saturday, February 4, 2012

Princess Aurora’s Pink and Blue Gown - The Plan

Click here for Princess Aurora's Pink and Blue Gown - Part 1

Like most of my projects lately, I found myself on a crazy tight time schedule when making the Sleeping Beauty dress. I swear I’m not a procrastinator! Well… that’s a lie, I’m a horrible procrastinator. Even so, I’m also suuuuuuper busy all the time. From early Nov. straight through mid Jan. I spent almost every day in front of the sewing machine for at least 8 hours. Throw in the two trips to Kansas City, two family holidays, a craft show, and four finals all in this same time period I’m surprised I got anything done at all! With everything on my plate I only had the week between Christmas and New Years to get this dress ready for the party. A full ball gown in a week?… Pfft, no problem. School was out, I could totally do this /flexes.

In typical me fashion, I started by obsessing over the design concept. I know that I technically had a print out of the exact gown I wanted to make from the movie still, but there were things that I still needed to work out. Like how I wanted to go about making the overskirt, collar, and splashed designs.

For full disclosures sake, I should probably let you know that I started with Butterick Pattern 4453 as a base. It was a pattern I found in my stash, but it’s discontinued now.


It had the right basic shape and feel for the dress I wanted, but I had to alter it a ton to get the desired finished pattern. I think the only pieces I didn’t alter, tweak, or completely change were the two side panels of the skirt. Even then I should have added pockets! ***Why oh why do I always forget to add pockets ***

So, I started scouring the internet for ideas… Do you know how many really ugly adult Princess Aurora dresses there are out there? It’s really quite astounding.

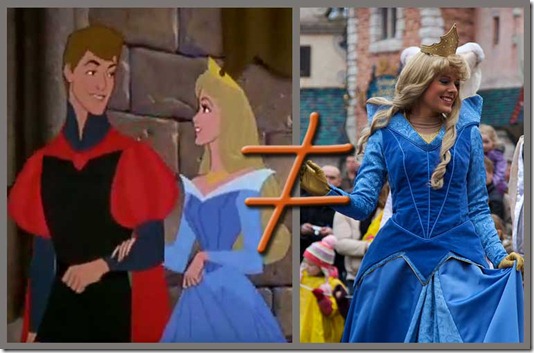
I suppose that’s unfair. A lot of the cosplay dresses people created were really cute, but the official Disney Land/Disney World dresses were so obnoxious and weird. The ‘collar’ of the dress wasn’t even sitting on the shoulders where it was supposed to be.

One-of-these-things-is-not-like-the-other
See? Weird. It vaguely looks the same, but at the same time is totally unflattering and odd. And to top it off this was one of the only official blue dresses I could even find to compare directly with the original; almost all of them are Pink! I couldn't find a single one that resembled the splashed dress I was planning on making.

/sigh. I decided instead of looking at reference pictures from what other people had made, I’d simply wing it. Worst case scenario, I’d totally botch the whole dress and just wear mickey mouse ears to the party. No one would ever have to know.

I set about making my under corset and mockup of the bodice, which took about two days. I almost skipped making a mockup due to the time crunch, but I’m soooo glad I didn’t. With the under corset on, the original pattern had to be taken in and altered all over the place. Because of the way I planed to make the splashes there would have been practically no way to do this post construction, so my extra few hours of work saved me a lot of grief. I’m almost positive there would have been tears if I’d made the gown straight from the original pattern. Lesson of the day: Always make a mock-up!

With the fitting completed it was time to start sewing the actual dress…

Click here for Princess Aurora's Pink and Blue Gown - Part 3
Click here for Princess Aurora's Pink and Blue Gown - Part 4
Click here for Princess Aurora's Pink and Blue Gown - Part 5
Click here for Princess Aurora's Pink and Blue Gown - Part 6

~~~

What do you think of the Disney World dresses? Am I just crazy, or do you think they look slightly weird too?

Thursday, February 2, 2012

A Disney New Years

I’m baaaaaaaack.

The trip to Breckenridge was absolutely amazing and so much fun. There was skiing, snowmobiling, pottery making, and even a wedding! However, now that I’m back I’m realizing just how far behind I am in mundane responsibilities, like school *mutters*. Because of this, it will likely be a few days before I dive into a new project.

There is good news though. You see, this leaves me more than enough time to make posts for one of my favorite costumes of all time, my Sleeping Beauty dress!

Every year my best friends throw an amazing New Years party and each time there is a new theme. Once it was 80s, another it was fancy cocktail attire, but this year it was going to be Disney! How much fun is that? Even though I had a million ideas rolling around in my head, from the carpet in Aladdin to the feather duster in Beauty and the Beast, there was never any doubt in my mind as to what my costume would be: Princess Aurora. *** The one character where naps are perfectly acceptable as role playing! ***

One of my moms favorite Disney movies of all time has got to be Sleeping Beauty. *** I remember it being played in our house A LOT growing up.*** As a kid, she even made me a blue sleeping beauty dress for Halloween one year. However, as I researched the gown for this party I started to notice a disturbing trend when it comes to Aurora’s attire. When exactly did she become a pink princess?!?!?

As most of you know, in the movie there is a great faerie fight between Flora and Merryweather over whether the dress should be pink or blue. They bicker and change the dress back and forth with magic over and over, making it one of the most memorable parts of the story. However, having seen the film about 100 bazillion times I clearly remember her birthday dress being blue for about 95% of the movie. Despite this, you can’t find the blue dress anywhere nowadays! From books to cartoons, to even costume stores and DisneyLand it is now a strictly pink dress. It’s as if the blue gown never existed!

There are many debates and explanations online as to why Disney has decided to shun Aurora’s blue dress; it usually comes down to their need to distinguish her from Cinderella, as they both have blonde hair. Let me tell you though, it is an absolute outrage in my eyes. So, I decided that when making my New Years costume I would not bow to Disney’s pink princess ploy. She was not pink darnit! But….. I also determined that I wouldn’t make a strictly blue dress either, since she wasn't only blue.

Instead I would make, by far, the best dress in the whole movie. The one that immediately sprang to mind every time I thought of Sleeping Beauty.
1223273958_1
The pink and blue splashed dress from the cabin scene!

Yes, I know. Aurora never technically wore this dress. But who cares! It was one of the best scenes in the whole movie and definitely memorable. Plus, it reminds us that Sleeping Beauty was not strictly pink nor blue. She was both.

Take that Disney!

Click here for Sleeping Beauty's Pink and Blue Splashed Dress - Part 2
Click here for Sleeping Beauty's Pink and Blue Splashed Dress - Part 3
Click here for Sleeping Beauty's Pink and Blue Splashed Dress - Part 4
Click here for Sleeping Beauty's Pink and Blue Splashed Dress - Part 5
Click here for Sleeping Beauty's Pink and Blue Splashed Dress - Part 6

~~~~~

Do you have a favorite color gown? It’s alright if it’s pink, I promise I won’t bite your head off ^_~.

Thursday, January 19, 2012

Orange and Teal ‘Steampunk’–Part 5: Done!

Click here for Orange and Teal 'Steampunk' - Part 1
Click here for Orange and Teal 'Steampunk' - Part 2
Click here for Orange and Teal 'Steampunk' - Part 3
Click here for Orange and Teal 'Steampunk' - Part 4

I know it’s been a few days, but I was so excited about current projects that I put this post on the backburner for a bit. Finally it's time for the completion of the Steampunk costume!

When it came to the bolero for this costume it was a bit of a struggle to find a pattern that would suit what I needed. I really wanted something that clasped near the throat, but I couldn’t find it anywhere. Since I was running short on time and I knew I would have to draft the sleeves as well, I decided to forgo it in favor of speed.


I started with B6533. Using the pattern exactly as is for the lining, I self drafted the top of the sleeve to poof out in a late 1800s fashion. Sadly I didn’t take any pictures of the drafting process since I was in such a rush, so all I have are images of the finished garment. I’m sure at some point I’ll make something similar again so I’ll be sure to take tons of photos then.
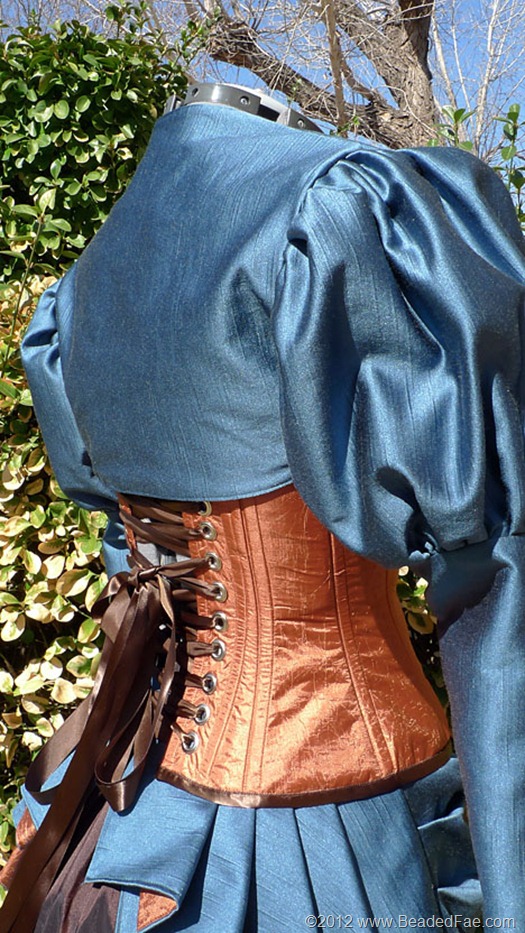
Orange and Teal Steampunk Bolero
Thanks to all my rushing, I actually finished with about a week to spare. With all that extra time, I decided I would complete the costume with a couple of neat accessories. Because the bolero didn't clasp at the neck like I wanted, I made a neck ruffle with a pretty orange crystal in the center.
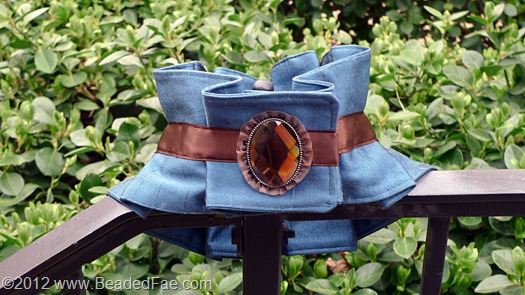
Orange and Teal Steampunk Neck Ruffle
It was basically just some pleated fabric with a couple of hook and eyes to clasp it in front. I stitched a strip of the same brown ribbon I’d used on the corset down the center and added the crystal. I can’t remember exactly but I’m wanting to say I just used FabriTac to attach it. It may have had holes to secure it with thread, but I don't think so. To make the crystal a bit more frilly I lined some brown ruffled ribbon around the outside.

I will admit it. I hate the neck ruffle! It was a good idea in theory, but I didn’t like the way it turned out. She really liked it though and didn’t want me to make her something different despite my many protestations. Further proof that my opinion is not the only one that matters ^_^.

Next I made probably the cutest accessory of my entire life. A tiny top hat! *** I'm a firm believer that everything is cuter in miniature! ***
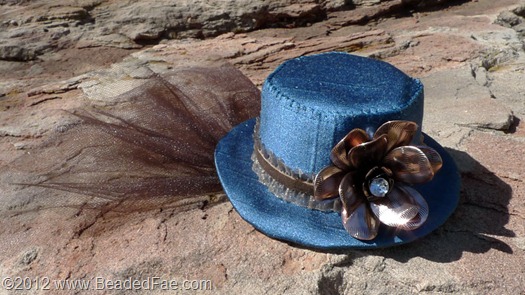
Orange and Teal Steampunk Miniature Hat
I started with a doll top hat I got from Hobby Lobby and added some of the same blue fabric as the bolero and overskirt. I didn’t have a pattern for this and was pretty much just winging it. Usually I don’t like to use glue in any of my costume construction, but I broke that rule here. On the outside it looks exquisite, but it’s basically glued straight onto the base hat. I did make sure to line it though, so you can’t see any of the mess within. I added some ‘decorative’ stitching around the top rim and added a ring of the same frilly ribbon from the neck ruffle.

One of my favorite parts of this hat is the giant copper flower. It looks like I specially made or bought the hat pin from a fancy hobby store or haberdashery, right? It’s totally not! Here in Oklahoma City there have been lots of ‘One Dollar Jewelry and More’ stores that have been popping up. I found this flower attached to one of those cheap adjustable rings for a buck! I just ripped off the cheap ring and glued the flower right on the hat. Perfect.

I finished it off by stitching on a couple of hair combs and some brown netting so that it would stay nicely in her hair.

With all the accessories finished I gave her the present on her birthday in lots of individually wrapped boxes. It was really fun to watch her unbox her costume one piece at a time.

Here is a couple pictures of the costume all completed!
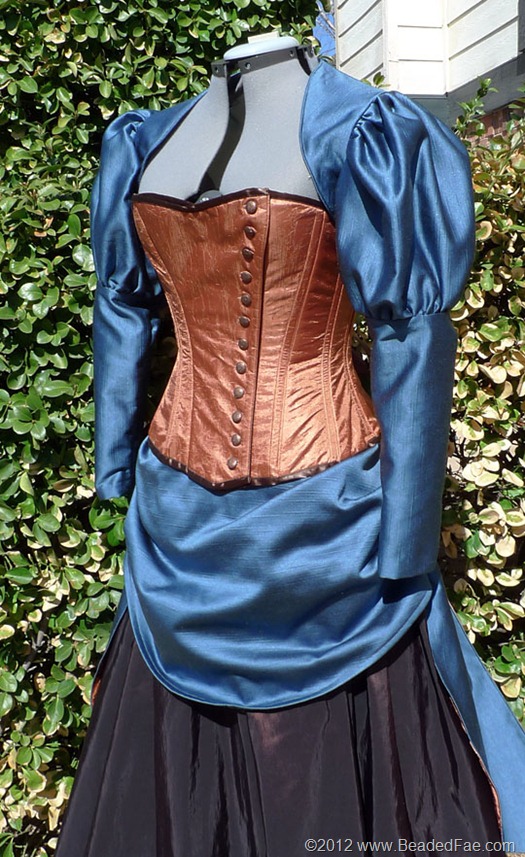
Orange and Teal Steampunk Costume Front
And the back!

Orange and Teal Steampunk Costume Back

Oh! I did sew a modesty panel for the back so her skin didn’t show through the lacing. I just never got a photo of it. Rest assured she was not hanging out of the back.

Perhaps the most frustrating thing about this costume is my lack of photos with my friend actually in it! It seems like all of the photos that are taken of her are indoors with horrendous florescent lighting. ***shudders*** I’ve been bugging her to take some photos out in natural light in it for my blog, but sadly she’s been sick for the past week or two. I guess I’ll just have to settle for what’s already available. Alas!

Amy Steampunk Dress 071


This was taken the night I gave her the costume. I don’t think it was her actual birthday but it was on time!


6125154281_e259a117b4_b


And here was a picture of her we found online from Dragon Con 2011. It’s one of those evil shots where the photographer didn’t give any indication that he was about to take a photo of her, so she wasn’t even remotely ready. But since it’s literally the only one I have of her in natural light I’m gonna post it! Hopefully she’ll get some new shots to me soon so I can update these.


So that about wraps things up. I absolutely loved making this costume and I’m really glad it worked out well. I can’t wait to make more Victorian and Steampunk themed garments!

Patterns Used:
    Mini Top Hat: Self Drafted (sort of)
    Neck Ruffle: Self Drafted
    Bolero: B6533 + some self drafting
    Corset: TV110 + some self drafting
    Over Skirt: TV303
    Base Skirt: TV201
    Bustle: TV101

Saturday, January 14, 2012

Orange and Teal ‘Steampunk’–Part 4

Click here for Orange and Teal 'Steampunk' - Part 1
Click here for Orange and Teal 'Steampunk' - Part 2
Click here for Orange and Teal 'Steampunk' - Part 3 

Do you want to know the preciously guarded secret to corset making? You have to promise not to tell anyone….

P1080605Okay, are you ready? Keep everything organized! It sounds really simple, but this is no joke. This particular corset has 6 panels on each side and an extra self drafted piece in the front, that’s 13 all together. With three different layers of fabric, that’s 39 pieces! If any of those stitched together upside down, backwards, or in the wrong order it completely changes the shape of the garment. A fabric marker, or chalk, is your best friend here. Mark everything! And double check before you stitch. As long as you keep everything in order, making a corset is really super simple. It’s just sewing a lot of seams together ~ And then pressing those seams with a tailors ham ~ before sewing a ton of straight lines for boning channels.

Sure there are a few extra steps I’m leaving out, but it’s not the scary intimidating garment most people assume it is. Any who, now that I’ve shared that super secret tip I’ll move on with the costume.


P1080621For this corset I used TV110. I really wanted there to be an extra flap of fabric over the busk that would button up along the corset. This would add two important things. First a bit of style to the corset so it didn’t look quite so much like underwear. More importantly though, it would add a slight bit of extra coverage for my friend. I could have added a modesty panel to the front, but it still would have seemed like you could see her skin between the busk. Since I know that would make her uncomfortable I wanted to do my best to alleviate it.  To add the front flap I just took the front panel pattern and, subtracting the middle seam allowance, placed it on the fold of the fabric to cut out a solid front. This is the same thing you’d do if you wanted to make the corset without the busk in front. Then I just sewed it alongside the front busk panel when I added the front side.

Perhaps the most nerve wracking part of this whole corset was adding the buttonholes. Anyone who has sewn buttonholes would likely feel my pain here. Even though most machines today make it really simple to put them in, any number of things can go wrong. The fabric could slip, or the thread could jam. And it’s not easy to recover if you have to pick out buttonhole stitches. The number of times the needle pierces the fabric pretty much leaves it shredded. It was scary to trust my machine to do it’s job without error after I’d spent hours carefully sewing the corset panels together. To make matters worse, I had to do it 12 times. Eep!

Thankfully everything turned out beautifully. I finished the corset up by adding some awesome orange and brown buttons and by binding it with a pretty satin ribbon I'd found that was in the same tone as the skirts.
P1090019
I’d hoped to include more information about the jacket in this post, but I’m off to take photos of my latest costumes today so I’ll have to cut this one short. Hopefully tomorrow I will be able finish up with some jacket and accessories!

Click here for Orange and Teal 'Steampunk' - Part 5

Friday, January 13, 2012

Orange and Teal ‘Steampunk’–Part 3

P1080533
Click here for Orange and Teal 'Steampunk' - Part 1
Click here for Orange and Teal 'Steampunk' - Part 2

Okay, so it was time to get busy. After my long fabric debacle the silver lining of this costume was knowing that there wouldn’t be too much in the way of custom pieces. Earlier in the week I perused TrulyVictorian.net and ordered the skirts, corset, and bustle that would be needed. ~ BTW, If you haven’t looked at their patterns before, I seriously recommend them. They’re absolutely amazing. ~ The only thing I couldn’t find was a jacket I really liked… but I’ll get into that later.

Doing things properly, I started with the foundation of the garment; the bustle. ~ At some point I will probably go on a rant about people not wearing the proper foundation garments for costumes, but for today I’ll stay on topic. ~

I’ll be honest, I really love this bustle. It was so easy to make and it even collapses down for easy travel. A few months earlier I had seen Artemisia's post about her experience with this pattern. ~ She’s the author of Diary of a Renaissance Seamstress and a wonderful read if you like Renaissance style clothing ~. She had the best idea of edging each of the petticoat frills with bias tape which I totally copied. It was really simple and added the cutest pop of color to an otherwise plain skirt. Sure no one would see it, but everyone walks a little taller when their underwear is cute right? She edged hers in black, but I decided to go with a light blue cause it seemed more airy.


P1080556The only problem I had with the bustle was of my own making. You see, I only had 5 and a quarter yards of white fabric… but the pattern called for almost 6. It was the middle of the night, and I had been so frustrated with the previous fabric woes I decided to go forth with what I had on hand. The petticoat flounces weren’t really ‘needed’ so it wasn’t as though the completed bustle is lacking. It’s just not as ‘floofy’ as it could be.

I whipped out the brown skirt pretty quickly using pattern TV201 because I wanted to be sure that it would fit over the bustle. ~ When working on a time schedule, premade patterns are your absolute best friend ~

In a fit of speed, it completely slipped my mind that I wanted to put a hidden pocket in this skirt. I suppose this eventually gave my friend an excuse to tote around a cute bag with her outfit, but costumes should have a place to stealthily hide your camera, phone, etc. while your hands stay free. /sigh. Live and learn.


Next I started working on the overskirt. Again a pattern saved my sanity as I was working into the wee hours of the morning. ~ Sometimes I feel like I should have sent Truly Victorian more money as a thank you present ~.

It was right about this point that I started to panic. Orange, teal, and brown… what in the world was I thinking?!?!?! This was going to be a disaster. Freaking out, I started obsessively pinning fabric up and staring at it to see if the colors were going to cause spontaneous eye spasms.
P1080589

Luckily, my compulsion helped me stop and take stock of which way I wanted the back panels to face. I had cut and stitched them with the intention of there being a huge splash of orange down the back, but instead of being this great impact, I found myself leaning more towards the blue. It seemed to set off the pick-a-boo pleats more. After asking for a few outside opinions, I decided to stick with my gut and flip them over.

Now that I had the bottom half of the outfit done it was time to finish the top, starting with a bright orange corset!

Click here for Orange and Teal 'Steampunk' - Part 4
Click here for Orange and Teal 'Steampunk' - Part 5

Thursday, January 12, 2012

Orange and Teal ‘Steampunk’–Part 2

Click here for Orange and Teal 'Steampunk' - Part 1

Okay, so I had my design with approximate fabric yardage needed all printed out and ready to go. Now all I needed was the fabrics.

This was a bit of a struggle. I’m very wary when it comes to ordering fabrics online without getting samples first. There’s no real way to know what the fabric feels like, or if my monitors colors are tuned exactly right. It’s just not a gamble I’m usually willing to make. Since, once again, I didn’t get the bright idea to make this costume until about a month before the event, waiting for fabric samples to be mailed and confirmed before purchase really wasn’t possible. I would be limited to brick and mortar stores. Being new to Oklahoma City, I knew of only about 4 or 5 stores that sold fabric. Choices were limited. On top of this I planned on using bright orange and blue in this design… this could very easily go horribly, terribly wrong.

As luck would have it, I found a gorgeous teal colored fabric in the clearance section of the very first store I went into. It was slightly more stiff that I wanted, but it was a beautiful color with nice grain lines. I was sold. However, I couldn't find any orange fabric in the entire store! ~ Aside from cotton of course ~  Is orange taboo now or something? I could find lots of burnt reds and marigold yellows… but no real oranges. Because I couldn’t very well buy one color fabric without knowing if I could find the others in the same tone, I reluctantly had to put the teal fabric back. ~ There were almost tears I tell ya ~

Over the next few days I went to every fabric store I could find in the area with no luck. There were blues… there were teals… there were browns, but no oranges. Maybe orange is only available from Sept-Nov like pumpkin pie? I was so frustrated. Was I was going to have to change my whole color scheme just because I couldn't find the right pop color?

Finally I decided I would drive the hour north to go to a second Hancock's. There is one about a stones throw from my house, but sometimes different stores in the same chain will have different fabric selections. I crossed my fingers and headed out.

My luck was in that day. In the upholstery section I found a gorgeous crinkled orange fabric. As a bonus I was about 95% sure that it was the perfect color to go with my previous clearance find. ~ that I of course didn't think to grab a sample of ~. I decided I would take the gamble and bought the entire bolt. ~ Apparently orange is a scarcity in this town… I wasn’t taking any chances. ~

I headed back to the clearance fabric and, thank my lucky stars, it was still there. I put my orange fabric sample up next to it and they went together beautifully. Yay! After that, it was pretty easy to find a brown fabric that went nicely with the other two.

P1080448

But after the fabric debacle I was almost an entire week behind on constructing her costume! I had to get cracking if I was going to finish on time.

Click here for Orange and Teal 'Steampunk' - Part 3
Click here for Orange and Teal 'Steampunk' - Part 4
Click here for Orange and Teal 'Steampunk' - Part 5

Wednesday, January 11, 2012

Orange and Teal ‘Steampunk’–Part 1

I have a friend who has naturally dark curly brown hair and an elusive hourglass figure. Aside from causing me extreme envy, her appearance has always has always given me the slight impression that she would be better suited to a different era. Perhaps it’s just my love of Victorian and Steampunk style clothing, but I’d been dying to get that girl in a corset and bustle for ages. So, for her birthday last year, I decided I would make it happen.

Narrowing down a general concept for this costume was extremely hard; mostly because I have hundreds, if not thousands, of reference pictures of Victorian style photos saved on my hard drive. ~ I might be a slight bit obsessed ~. Should it be a historically accurate garment, or a full out Steampunk creation complete with gadgets galore. Ugh, it was so hard to decide.

I wavered on this quite a bit. I didn’t really want to do a historically accurate gown, because part of the reason I wanted to put her in a corset and bustle was to show off her amazing figure. On the other hand, without discussing it with her first ~ due to the birthday surprise ~ I didn’t want to go with some super gadgety outfit in case it wasn’t to her liking. Plus that would have required me to learn about engineering such gadgets in a limited time frame. I plan on learning how to do these in the future… but I didn’t want to spend a month making a costume only to have the accessories be subpar.

In the end I decided to go with a design a bit down the middle. It’s not even close to historically accurate, but it’s also not crazy out there. I decided to leave off any ‘Steampunk’ embellishments, that way she could play it up whichever way the occasion called for.
Dolls 2 copy


The one major design choice I did make was bright colors. I haaaaaate how drab most Victorian and Steampunk clothes are. And there’s no real reason for it. ~ They did use color in the Victorian Era people! ... Perhaps not these colors, but colors none the less! ~

Now that I had a design, I was off to find the fabrics…

Click here for Orange and Teal 'Steampunk' - Part 2
Click here for Orange and Teal 'Steampunk' - Part 3
Click here for Orange and Teal 'Steampunk' - Part 4
Click here for Orange and Teal 'Steampunk' - Part 5

Thursday, January 5, 2012

Pirate Wench - Part 2

Click here for Pirate Wench - Part 1

I am by no means stickler for historical accuracy, but having seen one too many badly elasticized chemise’s in my day I decided to try to make this costume with absolutely no elastic. Silly, I know. I just kept getting horrible flashes of Party City style costumes with their cheap flimsy materials **shudders**. I didn’t want my friends costume to look like that. So I got to work…


P1070695I started with the corset. Now, I had never made a corset before. I’d made the renaissance style bodices that were the beginnings of corsets, but never an actual body altering garment. Instead of being intelligent and using a pattern for my first time, I decided to grab the bull by the horns and make a self drafted corset… with only measurements… and no fittings because it was going to be a surprise. Sometimes my brilliance astonishes even me.

Luckily I had a dress mannequin in her size so I wasn’t completely flying blind.

In retrospect the drafting of the corset really wasn’t all that bad. It wasn’t the body altering wonder that I hoped it would be, but it was fairly respectable. Plus, by drafting the pattern myself, I was able to leave enough room for the best part. Pockets!

My friend is obsessed with pockets. While they weren’t terribly practical, I can tell you that they did make her giddy with glee. I think she kept chap stick and cash in them.

P1070714

Next I moved onto the skirts. There wasn't anything particularly earth shattering about the skirts. I broke out a pattern, (M4090), I’d used before and made a couple of tweaks to it; like adding a few grommet lace ups along the sides.


As for the shirt, I can’t for the life of me remember what pattern I used. I know that there was one, it was just a simple wrap shirt, but I can’t find it anywhere. Alas.
Any who, I added some bias binding to the sleeves to make a drawstring casing. Simple yet effective.


Next came the jacket, which I’ll state up front, I’m still not happy with. I hadn't started this early enough and ran up too close to her birthday so I didn't have time to search out a better fabric. It’s nice, and it worked. It’s just a bit too heavy for my liking. It’ll definitely keep her warm in the fall though. I was aiming for a tighter fit so I used (V1266) in a few sizes down from her measurements without the sleeves.

P1070734

Finally it was time for the crowning glory. The article of clothing that pulls the entire ensemble together…


Bloomers!


P1070685Okay so I cheated a bit here on my no elastic rule. I made drawstring cases for the leg ties, but went ahead and added elastic to the waistband since her waist is so much smaller than her hips. I thought no one would ever see it, so it’d be okay. I was wrong! These turned out to be my friends favorite part of the entire outfit, so they got flashed around quite a bit

I technically used pattern (M6236), but with as much as I altered the simple pattern to fit my friends waist and hips I basically just drafted my own.


So I’d finally finished my first costume for someone else, I’d managed to keep it a secret for an entire month, and surprise her on her birthday weekend. She was thrilled and ran around showing the bloomers to anyone and everyone who would pay attention. And we even went to the KC Ren Fest that weekend so she got to wear her costume right away.

59375_1415700827983_1096445945_31017568_7607184_n

Patterns Used:
     Shirt - Unknown
     Corset - Self Drafted
     Skirts - (M4090)
     Jacket - (V1266) 
     Bloomers -  (M6236)

Lesson Learned:
     - Don't self draft your first corset. Use a pattern to see how they are supposed to work/fit first. Oh and always put boning down the center panel of a corset if you don't use a busk.... that's very important.

Wednesday, January 4, 2012

Pirate Wench – Part 1

pirateIn my hometown there is a huge eight week long Renaissance Festival every fall. My friends and I usually dressed up each year to attend, and though it changed from time to time we generally leaned toward the pirate genre. This was mostly due to one of our friends having an amazing pirate costume he had accumulated over the years. His girlfriend, one of my best friends for years, desperately wanted an outfit to wear whenever he dressed up. So, about a year or so ago, I decided to surprise her with a costume for her birthday.


After scouring the fabric stores and the internet for inspiration I finally came upon this fabric.

DSC01283


It was perfect! I had been toying with the idea of making a patchwork corset, and this design eliminated the need for all that quilting. Plus it’s got just the right amount of shiny. ~ I know you don’t know me very well, but I avoid shiny fabrics at all costs. They show every wrinkle and are so rarely flattering… I just prefer matte. ~

To top it all off it was on clearance for $3/yd!

So after a bit of tinkering I came up with the below design. I was completely happy with it, and thought it would be perfect. Alas, it was not to be. After a few ‘covert’ discussions with my friend, she indicated that she’d much rather a wench style costume with full draped skirts than captain attire. So it was back to the drawing board.

  AshleysCostume

The final costume turned out quite similar to this one, which you’ll see in the next post, and she loved it. I just think I’ll always be a bit more partial to this one myself…