Saturday, February 4, 2012

Princess Aurora’s Pink and Blue Gown - The Plan

Click here for Princess Aurora's Pink and Blue Gown - Part 1

Like most of my projects lately, I found myself on a crazy tight time schedule when making the Sleeping Beauty dress. I swear I’m not a procrastinator! Well… that’s a lie, I’m a horrible procrastinator. Even so, I’m also suuuuuuper busy all the time. From early Nov. straight through mid Jan. I spent almost every day in front of the sewing machine for at least 8 hours. Throw in the two trips to Kansas City, two family holidays, a craft show, and four finals all in this same time period I’m surprised I got anything done at all! With everything on my plate I only had the week between Christmas and New Years to get this dress ready for the party. A full ball gown in a week?… Pfft, no problem. School was out, I could totally do this /flexes.

In typical me fashion, I started by obsessing over the design concept. I know that I technically had a print out of the exact gown I wanted to make from the movie still, but there were things that I still needed to work out. Like how I wanted to go about making the overskirt, collar, and splashed designs.

For full disclosures sake, I should probably let you know that I started with Butterick Pattern 4453 as a base. It was a pattern I found in my stash, but it’s discontinued now.


It had the right basic shape and feel for the dress I wanted, but I had to alter it a ton to get the desired finished pattern. I think the only pieces I didn’t alter, tweak, or completely change were the two side panels of the skirt. Even then I should have added pockets! ***Why oh why do I always forget to add pockets ***

So, I started scouring the internet for ideas… Do you know how many really ugly adult Princess Aurora dresses there are out there? It’s really quite astounding.

I suppose that’s unfair. A lot of the cosplay dresses people created were really cute, but the official Disney Land/Disney World dresses were so obnoxious and weird. The ‘collar’ of the dress wasn’t even sitting on the shoulders where it was supposed to be.
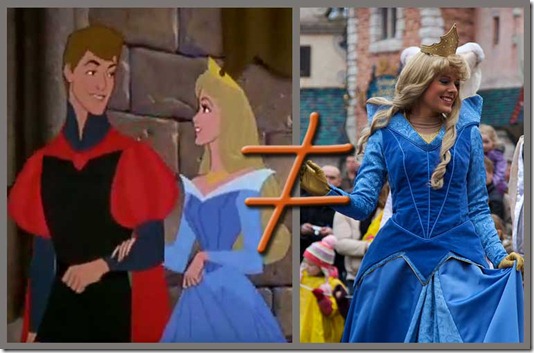
One-of-these-things-is-not-like-the-other
See? Weird. It vaguely looks the same, but at the same time is totally unflattering and odd. And to top it off this was one of the only official blue dresses I could even find to compare directly with the original; almost all of them are Pink! I couldn't find a single one that resembled the splashed dress I was planning on making.

/sigh. I decided instead of looking at reference pictures from what other people had made, I’d simply wing it. Worst case scenario, I’d totally botch the whole dress and just wear mickey mouse ears to the party. No one would ever have to know.

I set about making my under corset and mockup of the bodice, which took about two days. I almost skipped making a mockup due to the time crunch, but I’m soooo glad I didn’t. With the under corset on, the original pattern had to be taken in and altered all over the place. Because of the way I planed to make the splashes there would have been practically no way to do this post construction, so my extra few hours of work saved me a lot of grief. I’m almost positive there would have been tears if I’d made the gown straight from the original pattern. Lesson of the day: Always make a mock-up!

With the fitting completed it was time to start sewing the actual dress…

Click here for Princess Aurora's Pink and Blue Gown - Part 3
Click here for Princess Aurora's Pink and Blue Gown - Part 4
Click here for Princess Aurora's Pink and Blue Gown - Part 5
Click here for Princess Aurora's Pink and Blue Gown - Part 6

~~~

What do you think of the Disney World dresses? Am I just crazy, or do you think they look slightly weird too?

Thursday, February 2, 2012

A Disney New Years

I’m baaaaaaaack.

The trip to Breckenridge was absolutely amazing and so much fun. There was skiing, snowmobiling, pottery making, and even a wedding! However, now that I’m back I’m realizing just how far behind I am in mundane responsibilities, like school *mutters*. Because of this, it will likely be a few days before I dive into a new project.

There is good news though. You see, this leaves me more than enough time to make posts for one of my favorite costumes of all time, my Sleeping Beauty dress!

Every year my best friends throw an amazing New Years party and each time there is a new theme. Once it was 80s, another it was fancy cocktail attire, but this year it was going to be Disney! How much fun is that? Even though I had a million ideas rolling around in my head, from the carpet in Aladdin to the feather duster in Beauty and the Beast, there was never any doubt in my mind as to what my costume would be: Princess Aurora. *** The one character where naps are perfectly acceptable as role playing! ***

One of my moms favorite Disney movies of all time has got to be Sleeping Beauty. *** I remember it being played in our house A LOT growing up.*** As a kid, she even made me a blue sleeping beauty dress for Halloween one year. However, as I researched the gown for this party I started to notice a disturbing trend when it comes to Aurora’s attire. When exactly did she become a pink princess?!?!?

As most of you know, in the movie there is a great faerie fight between Flora and Merryweather over whether the dress should be pink or blue. They bicker and change the dress back and forth with magic over and over, making it one of the most memorable parts of the story. However, having seen the film about 100 bazillion times I clearly remember her birthday dress being blue for about 95% of the movie. Despite this, you can’t find the blue dress anywhere nowadays! From books to cartoons, to even costume stores and DisneyLand it is now a strictly pink dress. It’s as if the blue gown never existed!

There are many debates and explanations online as to why Disney has decided to shun Aurora’s blue dress; it usually comes down to their need to distinguish her from Cinderella, as they both have blonde hair. Let me tell you though, it is an absolute outrage in my eyes. So, I decided that when making my New Years costume I would not bow to Disney’s pink princess ploy. She was not pink darnit! But….. I also determined that I wouldn’t make a strictly blue dress either, since she wasn't only blue.

Instead I would make, by far, the best dress in the whole movie. The one that immediately sprang to mind every time I thought of Sleeping Beauty.
1223273958_1
The pink and blue splashed dress from the cabin scene!

Yes, I know. Aurora never technically wore this dress. But who cares! It was one of the best scenes in the whole movie and definitely memorable. Plus, it reminds us that Sleeping Beauty was not strictly pink nor blue. She was both.

Take that Disney!

Click here for Sleeping Beauty's Pink and Blue Splashed Dress - Part 2
Click here for Sleeping Beauty's Pink and Blue Splashed Dress - Part 3
Click here for Sleeping Beauty's Pink and Blue Splashed Dress - Part 4
Click here for Sleeping Beauty's Pink and Blue Splashed Dress - Part 5
Click here for Sleeping Beauty's Pink and Blue Splashed Dress - Part 6

~~~~~

Do you have a favorite color gown? It’s alright if it’s pink, I promise I won’t bite your head off ^_~.

Tuesday, January 24, 2012

Going on Vacation!

I'm leaving for my vacation in Colorado tomorrow, so there won't be any new posts for a couple of days. Don't panic; I'll be back with lots more of my sewing and craft adventures soon enough.

Weeeeeee vacation!

Sunday, January 22, 2012

White Mage Hoodie in Miniature–Part 3: Done!

Click here for WHM Hoodie in Miniature - Part 1
Click here for WHM Hoodie in Miniature - Part 2

Squeeeeeeeeeeeeeeeeeeeeeeeeeeeeeeeeeeeeeeeeeeeeeeeee!

It’s all finished. I’ll admit I was pretty much a slacker today and spent more time researching stuff for wedding invitations rather than working on the hoodie. But I finally got off my lazy bum around 5, and now it’s done!

Baby White Mage Hoodie (3)
You’ll notice that the zipper is now white. Apparently coat zippers only come in certain shades of red, and WHM red just isn’t one of them. I’m sure I could have special ordered one if I’d thought to check earlier… but meh. I think it looks pretty good with the white one anyway.

And the back!

Baby White Mage Hoodie Back
Yay for fixing those accent patterns! It would have had a really weird shaped plateau thing in the middle if I hadn’t caught that in time.

I must say, this hoodie turned out a lot larger than I thought it would. I’d read that Burda’s kid patterns ran big so I made the 9 mo. sized one instead of 12 mo., but even then it looks to be big enough to fit a two year old. Granted I don’t have kids, nor do I spend much time around them, so I may be way off in my guestimations. I suppose even if it’s too big he’ll grow into it eventually. I just hope it’s not the middle of summer when he finally does @_@.

Since I didn’t have a spare kid around to model this cute little jacket I decided to dig in my closet for one of my childhood stuffed animals. Theodore Edward Bear *** Ted E. Bear for short *** was the perfect size for the job and wore it beautifully.

White Mage Teddy Bear

I kind of like the irony of giving a child a, practically, all white hoodie. It's going to get dirty soooo fast ^_^

Any who, now that this is all done I’m not quite sure what I’ll start on next. I only have a few days before leaving for Breckenridge, so I don’t think I’ll get into anything too ambitious. Perhaps I’ll start playing around with invitation ideas and testing out the pomanders. Considering the wedding is only 4 months away, I really should stop being a slacker about this.

Pattern Used: Burda 9828.
   

Saturday, January 21, 2012

White Mage Hoodie in Miniature–Part 2

Click here for WHM Hoodie in Miniature - Part 1

Gah! I didn’t get quite finished today. I came really close, but a few hours ago I realized the zipper I’d purchased was the wrong color. ***Who knew red could clash with red?*** Since I have to wait til tomorrow to go grab a new zipper I figured there was no rush to get the lining put in tonight. Pending no serious disasters I should be done tomorrow though.

I did get a lot accomplished for the day. This morning I transferred all the pattern pieces to butcher paper so I could save the pattern, in tact, for future use. Then I drafted the red triangle borders that would line the edges of the hoodie. There was a tiny bit of a hiccup here. I made a stupid mistake and had to go back to redraft the back accents.

White Mage Hoodie Accents

Do you see it? The writings a bit small, but it’s there on the right.

I got a bit seam allowance happy and added the extra distance to my center back piece even though it was supposed to be cut out on a fold. Ugh! That would not make for a very pretty ‘triangle’ right in the middle of the hoodie. As soon as I finished cutting out my first red piece I realized my mistake. I felt sooooo dumb. It just goes to show that no matter how meticulous you are, it’s always possible to make tiny mistakes. Luckily these pieces are so small that not very much fabric was wasted by my mess up.

Other than that the day went by without a hitch. It basically just turned into a big assembly line of applique before quickly stitching the pieces together.

WHM Hoodie Assembly Line

The only difficult part of this was matching up the pockets to the front hoodie panels. Because the pockets sit so low on the jacket, the red accents invade their territory. I had to draft some extra triangles to make them all line up and then baste stitch everything to make sure nothing went askew. If I make the hoodie again in future I’m thinking about just leaving the pockets off all together. I mean, they’re cute and all, but what use does a 9 month old really have for pockets in their coat?

On a slightly unrelated side note, I really need to learn to use my fancy new embroidery machine. I really want clothing tags to sew inside my garments that have my companies name on them. I know people don’t normally see them, but they seem a bit more professional to me. Like it finishes off a piece. Plus it tends to show a bit more pride in the item. Since I don’t really have the time to spend fiddling with my new toy yet, I just used my regular machines alphabet function to stitch out my company name on some twill tape. It’s not as professional as a single embroidered tag, but it turned out kinda quirky cute.

Beaded Fae Designs

I stitched out his name too and added it into the front of the lining. I’m not sure of the whole ‘kids name inside their clothing’ protocol, but I thought it’d add a nice personal touch.

Whelp, it’s getting rather late, so I think I’m going to head off to sleep. That way I can wake up bright and early tomorrow and finish this awesome little hoodie!

Click here for WHM Hoodie in Miniature - Part 3: Done!

Friday, January 20, 2012

White Mage Hoodie in Miniature!

Ooooooh, what’s this you see? It’s the beginnings of a Baby WHM hoodie, that’s what!
White Mage Hoodie Materials. Red and White Fleece
I have been squeeing non stop about this project since I came up with it about three weeks ago. Despite my impatience to get started, I decided to be responsible and finish the diaper bag and do some school work before tearing into the fabric that was burning a hole in my craft table. *** I’m as shocked as you are by my self control, believe me ***

Hmm, I suppose I should take a step back and give you some back story so you can truly grasp how awesome this will be.

You see, I am a bit of a geek. I didn’t meet my significant other in a ‘normal’ fashion. Nor was this an eHarmony or Match.com deal. I met him through an MMO. ***For those non gamer geeks out there that’s a Massively Multiplayer Online Game***. Final Fantasy XI to be specific. More accurately I met him at a linkshell vacation in Breckenridge, CO , but that’s a tale for another day.

The real point is that we weren’t the only love connection to sprout out of our online groups gaming hobby. The linkshell leader, and one of my guys best friends, also found himself a gal through FFXI. ***from my hometown actually*** She moved out to the east coast with him about two years ago and a few months back gave birth to a little boy.

Despite the fact that none of us really play FFXI anymore, we have still kept in touch and a bunch of us are getting together next week for another group trip to Breckenridge. Since the linkshell leader was the one coordinated this amazing trip, I thought it would be awesome to make their little guy a Final Fantasy White Mage hoodie as a thank you gift. I mean, just one gamer parent would think a WHM hoodie was awesome all by itself, but this kid has two gamer parents!


If I know them as well as I think, their kid will end up practically living in this hoodie until he grows out of it or completely destroys it. Whichever comes first. Even then they may ask me to make another one.

So, that’s how this project got added into the mix. I think it's going to turn out absolutely adorable and can't wait to see it finished!

Now I just need to get started so I can have it done before we leave for Colorado. Eep!


Have you made any neat costumes for little ones? I must admit, I’m a huge sucker for children in cosplay. They’re so freakin’ cute!

Click here for WHM Hoodie in Miniature - Part 2
Click here for WHM Hoodie in Miniature - Part 3: Done!

Thursday, January 19, 2012

Orange and Teal ‘Steampunk’–Part 5: Done!

Click here for Orange and Teal 'Steampunk' - Part 1
Click here for Orange and Teal 'Steampunk' - Part 2
Click here for Orange and Teal 'Steampunk' - Part 3
Click here for Orange and Teal 'Steampunk' - Part 4

I know it’s been a few days, but I was so excited about current projects that I put this post on the backburner for a bit. Finally it's time for the completion of the Steampunk costume!

When it came to the bolero for this costume it was a bit of a struggle to find a pattern that would suit what I needed. I really wanted something that clasped near the throat, but I couldn’t find it anywhere. Since I was running short on time and I knew I would have to draft the sleeves as well, I decided to forgo it in favor of speed.


I started with B6533. Using the pattern exactly as is for the lining, I self drafted the top of the sleeve to poof out in a late 1800s fashion. Sadly I didn’t take any pictures of the drafting process since I was in such a rush, so all I have are images of the finished garment. I’m sure at some point I’ll make something similar again so I’ll be sure to take tons of photos then.

Orange and Teal Steampunk Bolero
Thanks to all my rushing, I actually finished with about a week to spare. With all that extra time, I decided I would complete the costume with a couple of neat accessories. Because the bolero didn't clasp at the neck like I wanted, I made a neck ruffle with a pretty orange crystal in the center.

Orange and Teal Steampunk Neck Ruffle
It was basically just some pleated fabric with a couple of hook and eyes to clasp it in front. I stitched a strip of the same brown ribbon I’d used on the corset down the center and added the crystal. I can’t remember exactly but I’m wanting to say I just used FabriTac to attach it. It may have had holes to secure it with thread, but I don't think so. To make the crystal a bit more frilly I lined some brown ruffled ribbon around the outside.

I will admit it. I hate the neck ruffle! It was a good idea in theory, but I didn’t like the way it turned out. She really liked it though and didn’t want me to make her something different despite my many protestations. Further proof that my opinion is not the only one that matters ^_^.

Next I made probably the cutest accessory of my entire life. A tiny top hat! *** I'm a firm believer that everything is cuter in miniature! ***

Orange and Teal Steampunk Miniature Hat
I started with a doll top hat I got from Hobby Lobby and added some of the same blue fabric as the bolero and overskirt. I didn’t have a pattern for this and was pretty much just winging it. Usually I don’t like to use glue in any of my costume construction, but I broke that rule here. On the outside it looks exquisite, but it’s basically glued straight onto the base hat. I did make sure to line it though, so you can’t see any of the mess within. I added some ‘decorative’ stitching around the top rim and added a ring of the same frilly ribbon from the neck ruffle.

One of my favorite parts of this hat is the giant copper flower. It looks like I specially made or bought the hat pin from a fancy hobby store or haberdashery, right? It’s totally not! Here in Oklahoma City there have been lots of ‘One Dollar Jewelry and More’ stores that have been popping up. I found this flower attached to one of those cheap adjustable rings for a buck! I just ripped off the cheap ring and glued the flower right on the hat. Perfect.

I finished it off by stitching on a couple of hair combs and some brown netting so that it would stay nicely in her hair.

With all the accessories finished I gave her the present on her birthday in lots of individually wrapped boxes. It was really fun to watch her unbox her costume one piece at a time.

Here is a couple pictures of the costume all completed!

Orange and Teal Steampunk Costume Front
And the back!

Orange and Teal Steampunk Costume Back

Oh! I did sew a modesty panel for the back so her skin didn’t show through the lacing. I just never got a photo of it. Rest assured she was not hanging out of the back.

Perhaps the most frustrating thing about this costume is my lack of photos with my friend actually in it! It seems like all of the photos that are taken of her are indoors with horrendous florescent lighting. ***shudders*** I’ve been bugging her to take some photos out in natural light in it for my blog, but sadly she’s been sick for the past week or two. I guess I’ll just have to settle for what’s already available. Alas!

Amy Steampunk Dress 071


This was taken the night I gave her the costume. I don’t think it was her actual birthday but it was on time!


6125154281_e259a117b4_b


And here was a picture of her we found online from Dragon Con 2011. It’s one of those evil shots where the photographer didn’t give any indication that he was about to take a photo of her, so she wasn’t even remotely ready. But since it’s literally the only one I have of her in natural light I’m gonna post it! Hopefully she’ll get some new shots to me soon so I can update these.


So that about wraps things up. I absolutely loved making this costume and I’m really glad it worked out well. I can’t wait to make more Victorian and Steampunk themed garments!

Patterns Used:
    Mini Top Hat: Self Drafted (sort of)
    Neck Ruffle: Self Drafted
    Bolero: B6533 + some self drafting
    Corset: TV110 + some self drafting
    Over Skirt: TV303
    Base Skirt: TV201
    Bustle: TV101